The Create button in Panopto allows those with Creator access (such as module leaders, co-teachers, and professional services staff) is where you can upload a video, build a session, download the Panopto desktop recorder, set up a screencast using Panopto Capture and more!
How do I get access to the Create button?
In order to have Creator access to Panopto you will either need to have a Moodle course that you are an editing teacher on (such as being a module leader or co-teacher) and activated your account via Moodle or have activated your Creator account using the steps to access Panopto for professional services and non-teaching staff.
Once you have activated your Creator account you will have both a My Folder personal sandbox and be able to see and use the Create button.
When you record videos using Zoom, those videos are automatically uploaded to the Panopto video library and can be found using these steps to find your videos in Panopto.
If you prefer not to use Zoom to pre-record videos, or would like to upload other multimedia recordings to Panopto then there are several options to consider.
How do I upload a video to Panopto?
If you already have a video ready, such as an MP4 video of a narrated PowerPoint, you can upload the video directly into the Panopto video library.
- Go to Panopto, by default ‘Moodle’ appears in the dropdown menu for sign-in. This is the correct choice.
- Click Sign In to be directed to the Moodle login page.
- In the Moodle login page, sign in with your user ID (without @brookes.ac.uk) and Brookes password.
- You’ll be redirected to your Panopto home page.
- Select My Folder from the left-hand navigation menu.
- Click on the purple Create button on the left-hand side of the screen and choose Upload Media from the dropdown list.
- Click inside the box to open the file chooser in your computer.
- Select your video and click Open.
- Wait for the upload to finish. Do not close this screen until it is finished uploading.
- Once it is finished uploading, you can then edit or share the video.
How do I use Panopto Desktop Recorder?
Ready to record your own video? You should first consider what method will produce the best results. If you are off-campus or working from home with a personal broadband connection or wifi, then it is recommended that you record your videos using the desktop recorder as you will not be limited by a slow wifi-connection or other disruptions.
First, download the Panopto Desktop Recorder.
Next, start a new recording. The following instructions are for using Panopto for Windows. Please visit Panopto Support for instructions for Mac users.
- Go to Panopto, by default ‘Moodle’ appears in the dropdown menu for sign-in. This is the correct choice.
- Click Sign In to be directed to the Moodle login page.
- In the Moodle login page, sign in with your user ID (without @brookes.ac.uk) and Brookes password.
- You’ll be redirected to your Panopto home page.
- Select My Folder from the left-hand navigation menu.
- Click on the purple Create button on the left-hand side of the screen and choose the desktop recorder (it is the first option).
- Once a new window pops-up, choose the Launch Panopto button.
- If you have downloaded the Panopto desktop recorder to your device, the application will open.
- Under Session Settings, select the drop-down arrow to select the folder where your recording will be saved (i.e. your My Folder).
- Give your file a unique name (such as HIST 4001 Lecture 1: 29 January 2021).
- Under Primary Sources, select the Audio drop-down menu and choose the microphone you will be using for the recording.
- Test the volume of your microphone by speaking for a moment and watching the Volume bar, if the volume stays in the red section of the bar that means it is quite low, so you will need to move the slider up to increase the volume.
- To record your webcam, select Primary Sources and Video to choose your webcam from the drop-down menu.
- For most videos, use Standard quality.
- Under Secondary Sources, select Capture PowerPoint to enable capture of a PowerPoint presentation.
- Select the PowerPoint tab on the Secondary Sources viewer and click the Open a Presentation button to choose a presentation.
- Once a PowerPoint presentation is open you will see a small thumbnail image of the presentation in the Secondary Sources viewer.
- If you want your PowerPoint to start presenting in full screen as soon as you click Record, tick the box to Start presenting when recording starts.
- You are now ready to record.
- Click the Record icon at the top of the screen.
- Once you’ve clicked Record the icon will automatically switch to Stop and Pause icons.
- When you are ready to stop the recording, click Stop.
- The results of the recording will be shown on the Manage Recordings screen, which includes the current status of the uploading process for your videos to the Video Library.
How do I use Panopto Capture?
Ready to record your own video? You should first consider what method will produce the best results. If you are on-campus, or have access to a fast and reliable broadband connection, you can record online directly to Panopto using screen capture.
Setting up Screen Capture correctly
- Go to Panopto, by default ‘Moodle’ appears in the dropdown menu for sign-in. This is the correct choice.
- Click Sign In to be directed to the Moodle login page.
- In the Moodle login page, sign in with your user ID (without @brookes.ac.uk) and Brookes password.
- You’ll be redirected to your Panopto home page.
- Select My Folder from the left-hand navigation menu.
- Click on the purple Create button on the left-hand side of the screen and choose Panopto Capture from the dropdown list.
- Click the microphone icon to select an audio source, such as a lapel microphone.
- Click the video camera icon to select a video source, such as your webcam.
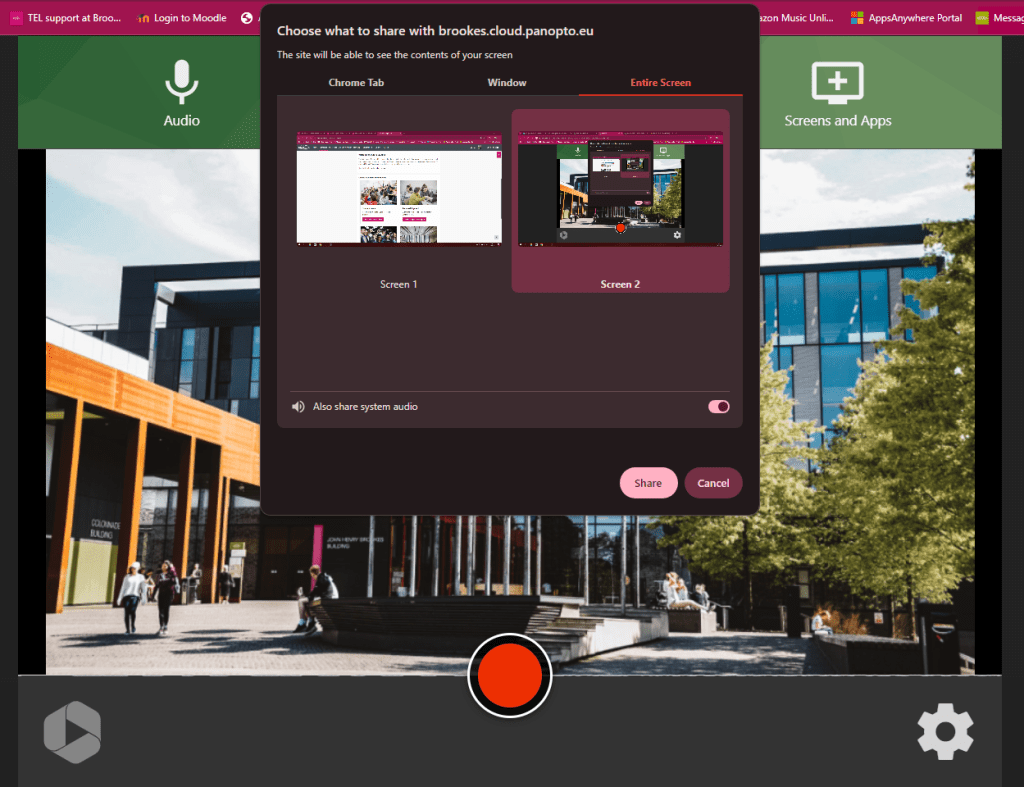
- To record a screen, application window, or individual browser tab, select the monitor icon with the plus arrow.
- To record everything that happens on a screen, choose Your Entire Screen. Then, select the screen you want to record, tick Share Audio, and click Share.
–
Starting and Stopping the Recording
- To begin recording your video, click the red circle button at the bottom centre of Panopto Capture.

- After a 5 second countdown the recording will begin.
- To stop recording, select the red square button at the bottom centre of Panopto Capture.

- The video will automatically begin uploading to the Video Library.
- Do not close the Panopto Capture browser tab until the upload is complete.
- When your video is ready you will be presented with a page showing your video’s uploading progress.
- Don’t close the screen until it reads Getting your video ready for editing: It’s safe to close your browser window or Your video is ready.
