Record (narrate) a presentation
From the Slide Show ribbon, select Record Slide Show.
More information on how to record can be found on the Microsoft Support web site: Microsoft Support: Record PowerPoint presentations (opens in new tab)
Export a recorded presentation as an mp4
Windows
Once you have completed your recording, you can export it as an mp4 video file. First, make sure you have saved your presentation.
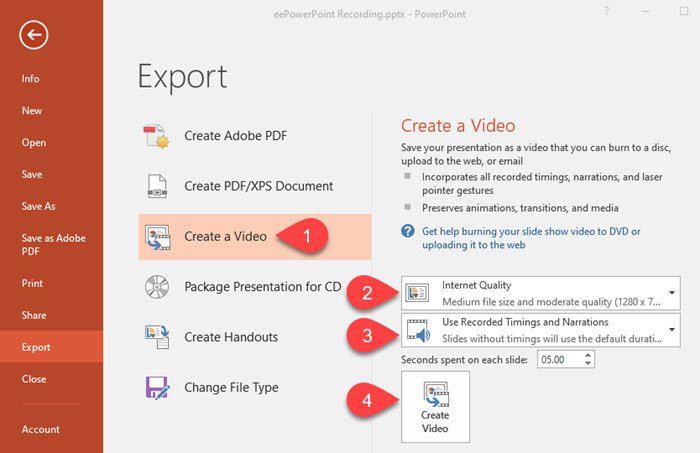
- Click File, Export, Create a Video.
- Choose Internet Quality (or Low Quality for a smaller file size).
- Choose Use Recorded Timings and Narrations.
- Click Create Video.
- Wait for the video to be created. You can see the progress in the status bar at the bottom of the PowerPoint window.
The resulting mp4 video file will be located in same folder as your PowerPoint file.
You can upload the mp4 file to Google Drive and add the link to Moodle to share with your students.
Mac
When you are ready to export:
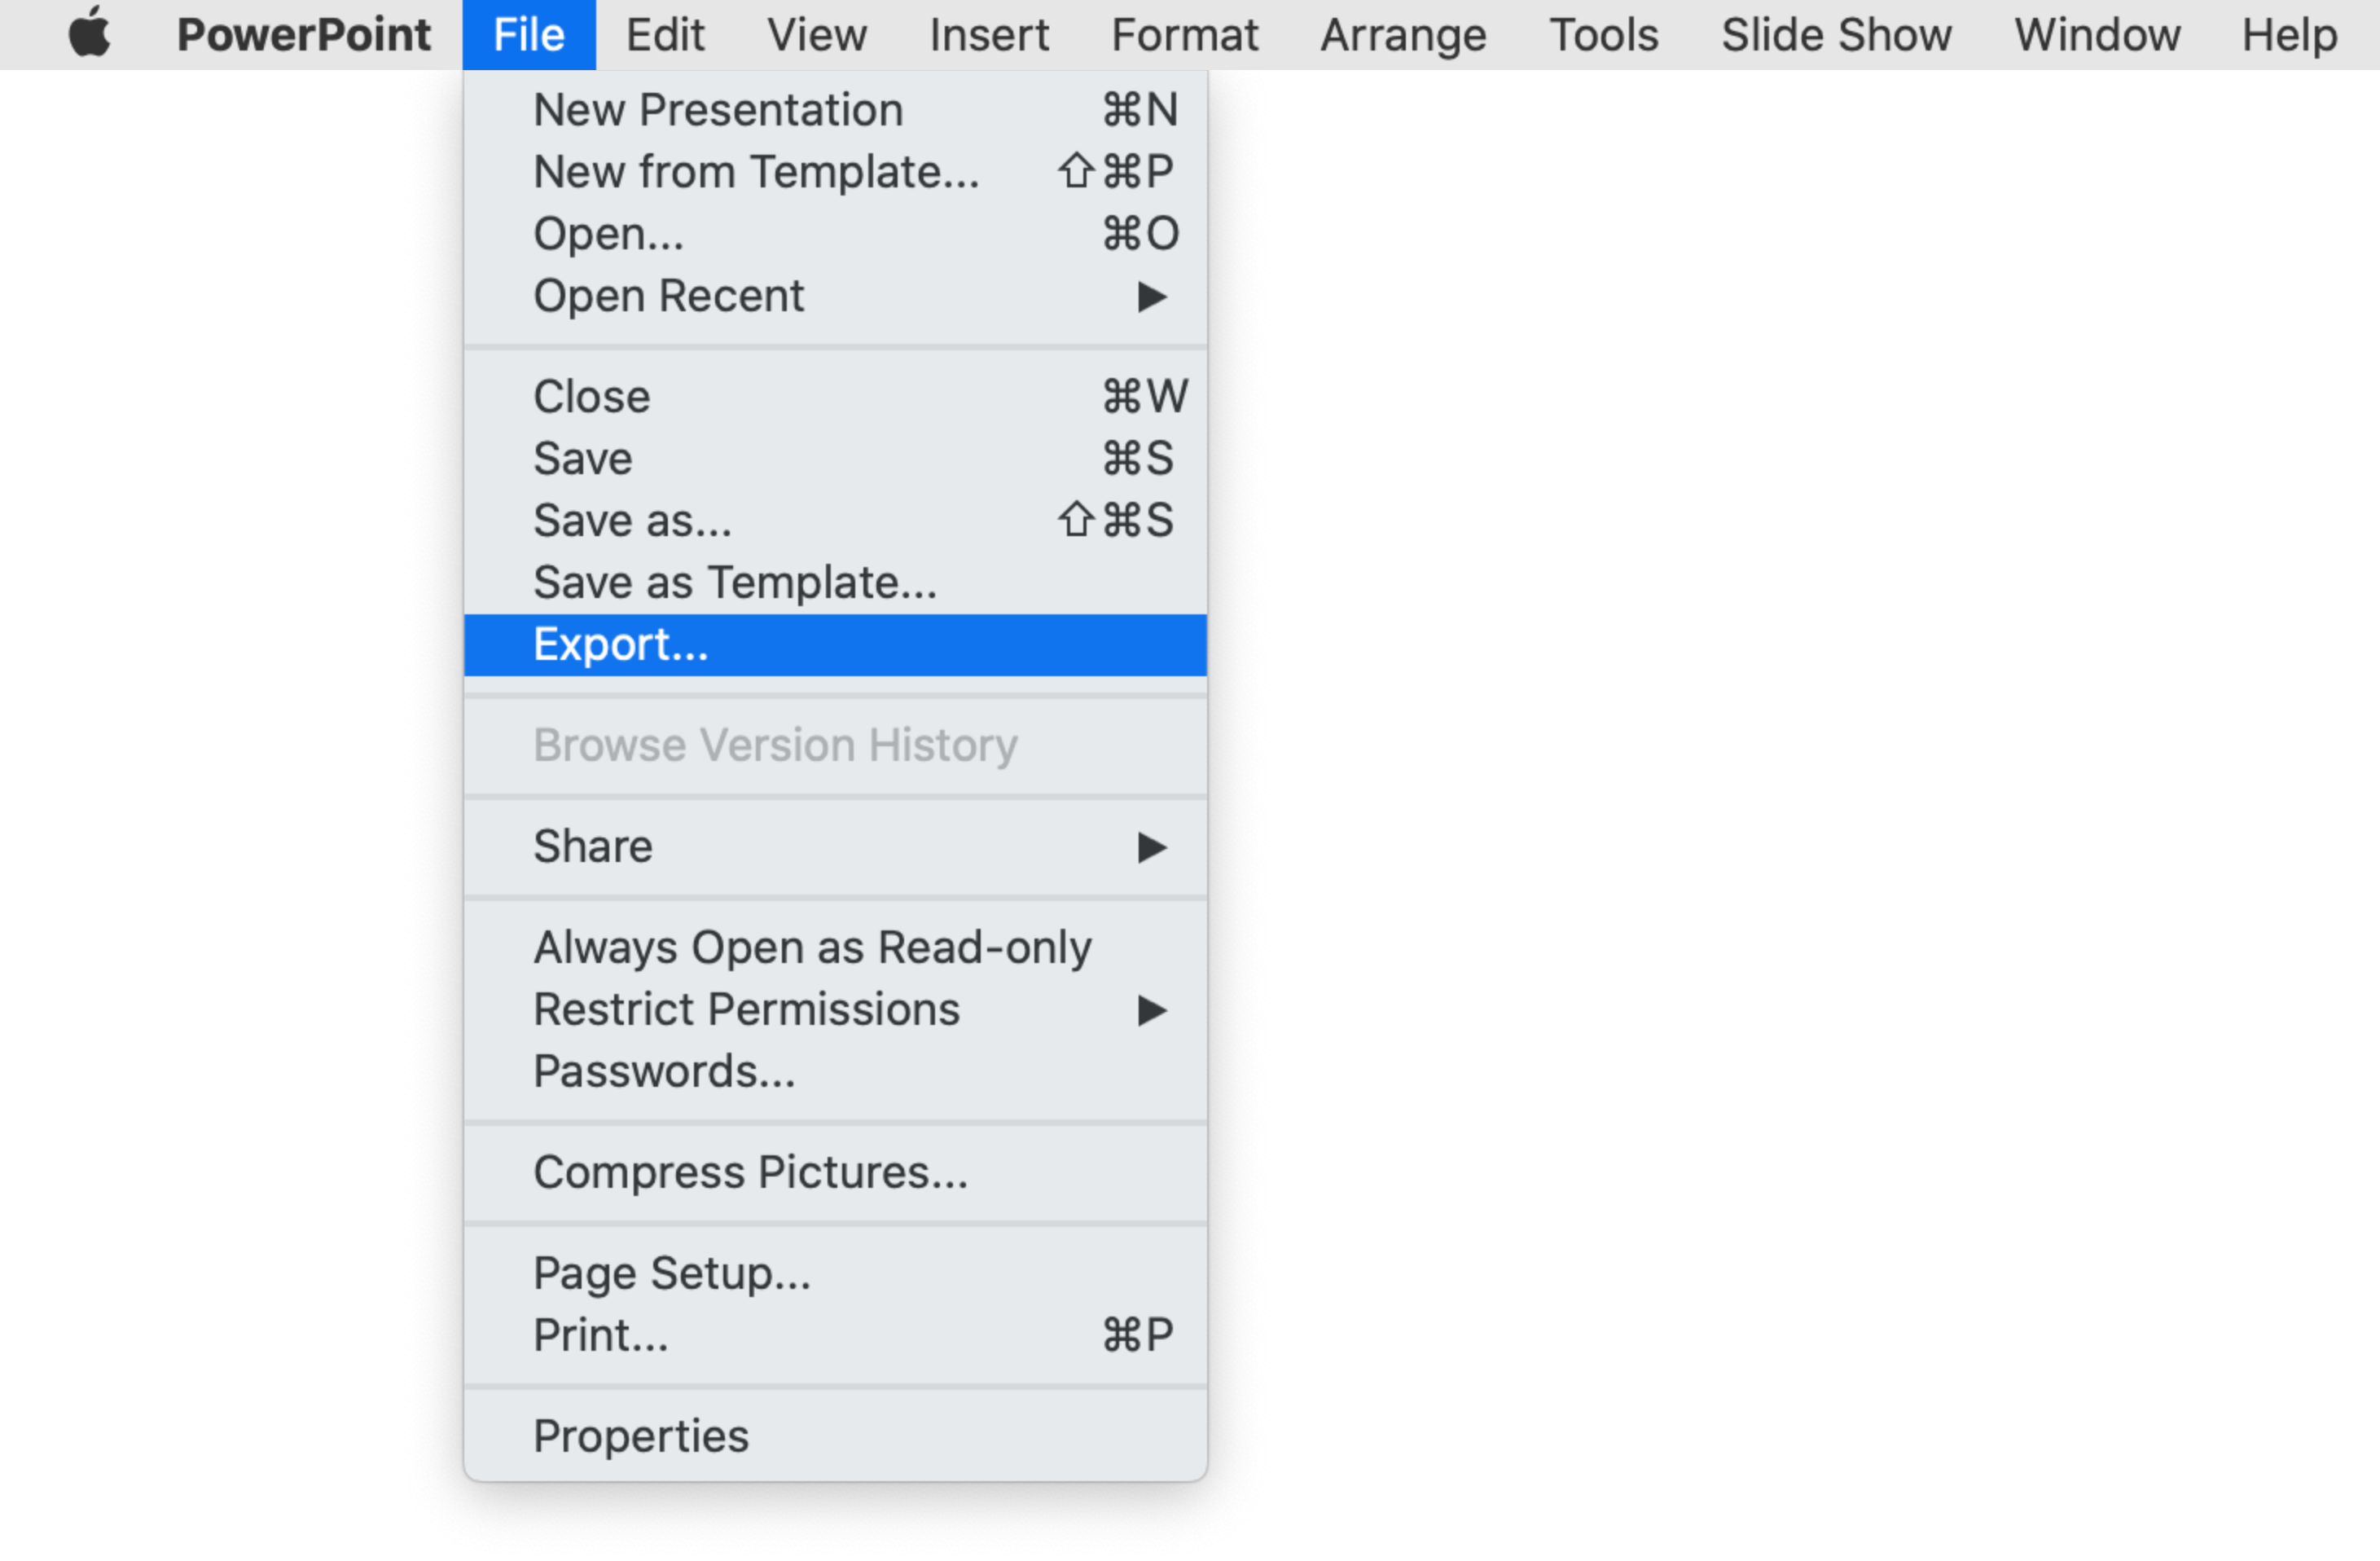
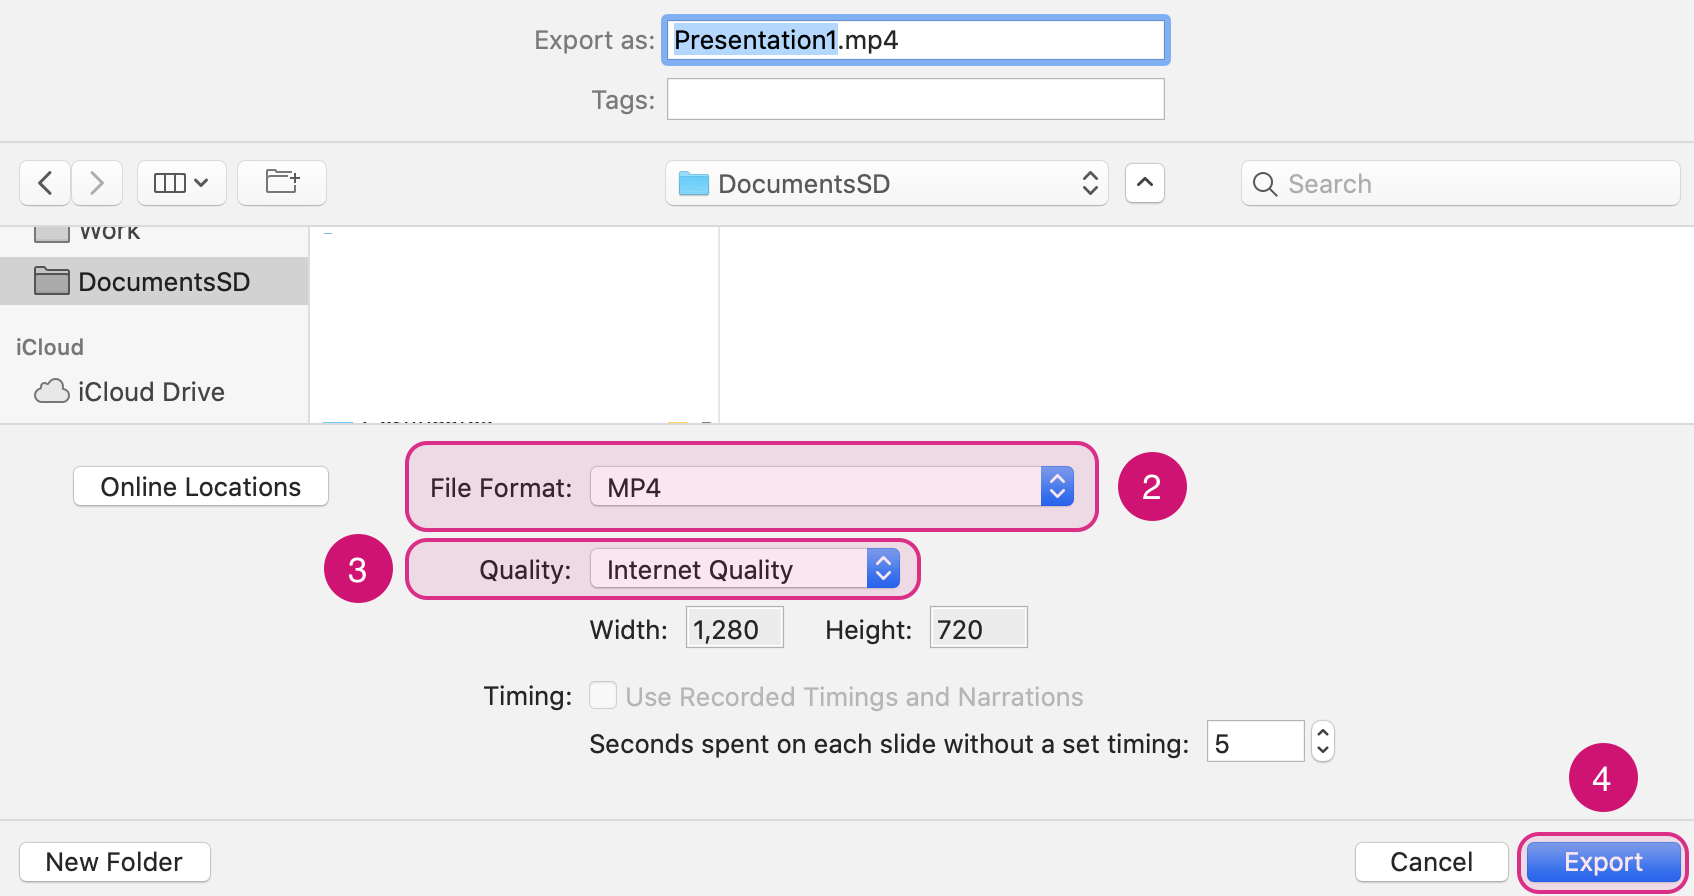
- Select File > Export.
- Open the File Format list and select MP4.
- For Quality choose Internet Quality.
- Click Export to save it locally on your computer.
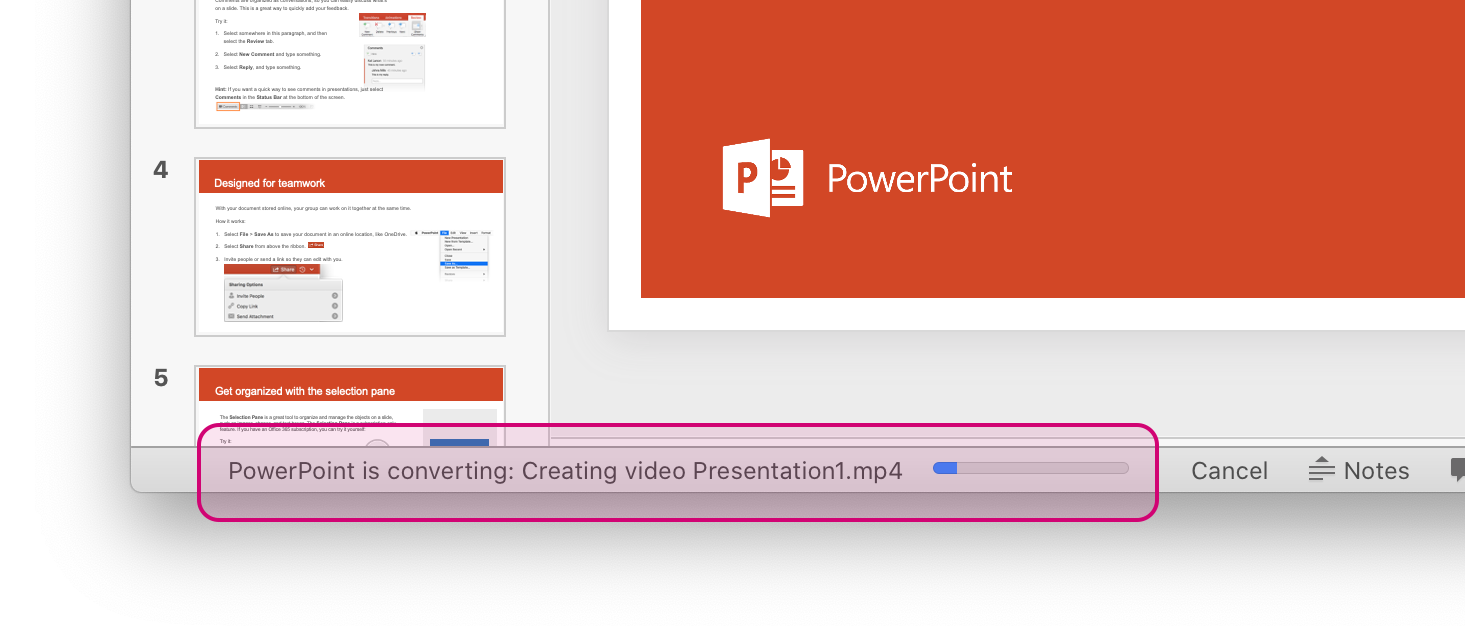
After exporting, PowerPoint will start converting your presentation to MP4 and the progress will appear at the bottom of the window as shown below:
Upload the mp4 to the Panopto Video Library
Once the video is saved as an mp4, you can upload the video directly into the Panopto Video Library using the Upload Media option, which is accessible via the Create button in Panopto.
Learn it with a video
The video shows step by step how to record PowerPoint slides with audio, based on two scenarios:
- adding audio just to a couple of slides and export it as PowerPoint presentation (
*.pptx), - adding audio to every slide and export it as a video with narration throughout (
*.mp4).
Transcript
To add narration to your PowerPoint slides, you will need a microphone. Earphones with an integrated microphone, such as the ones that came with your phone, can help you reduce background noise.
Before starting to record, review the guidance on Moving Teaching and Assessment Online and note that each recorded section for a teaching session must be 5-7 minutes long maximum. So you may need to review how your original session can be broken up into coherent chunks before you start recording. Think about what you want the students to take away from the session and make some notes before you start.
Now there are two ways to create learning content with PowerPoint: 1) in the first scenario you have a number of slides with notes and links that your students can read and in the last slide you would like to add a 5-minute audio recording with study advice or narrate an example related to your topic. 2) in the second scenario you can talk on each slide and make a slideshow video with narration throughout.
Recording audio for just one or two slides
Let’s look at the first scenario.
When you are ready, select the slide you would like to add audio to from the left-hand pane, click Slide Show from the top and then Record slideshow.
This will begin the recording immediately for the slide you selected.
Start narrating only when the timer shows 1 second, because otherwise the beginning of your narration won’t be recorded.
If you wish to add audio to the next slide use the arrows or the thumbnails at the bottom to go to previous slides. Remember to start narrating when the timer shows 1 second.
Once you finish, click End Show from the top left corner and click Yes to attach the audio to the slides.
Now go back to the Normal view of your slidedeck and you will notice that each slide for which you recorded audio displays a speaker at the bottom right.
Hovering the mouse over the speaker will reveal an audio player that allows you to playback the audio you recorded for this slide.
If you are not happy with the audio for a certain slide, choose that slide and click Record Slide show again.
Record the new narration, click End Show and confirm the change with a Yes.
To export your slides, click File, select Save as and for File Format choose PowerPoint Presentation (pptx file) or PowerPoint Show (ppsx file).
PowerPoint Show means your audience will see the slide show run when they open the file, rather than seeing the slides in edit mode.
Once ready, find the video locally on your computer and upload it to Google Drive.
Then, enable sharing, copy the link and add it to Moodle.
Recording a slideshow with narration throughout
In the second scenario we will be recording a slideshow with narration and then export it as a video.
When you are ready, click Slide Show from the tabs at the top and choose Record Slide Show.
Clicking Record Slide Show will begin the recording immediately, so you can start narrating.
Use the arrows below the slide thumbnail to advance the slide (2 sec pause) as shown.
As you move to the next slide, take a small pause and start narrating when the timer starts again.
This is because the timer resets itself every time you change a slide and needs a second for the recording to start again. Because audio is being added on a per-slide basis.
Not taking pauses between slides will result in audio dropouts.
If during the narration you wish to take a break, click the Pause icon from the top left.
Then, click on the Play icon to continue with narration.
Once you finish, click End Show from the top left corner and click Yes to attach the audio to the slides.
Now go back to the Normal view of your slidedeck and you will notice that each slide displays a speaker at the bottom right.
Hovering the mouse over the speaker will reveal an audio player that allows you to playback the audio you recorded for this slide.
If you are not happy with the audio for a certain slide, choose that slide and click Record Slide show again.
Record the new narration, click End Show and confirm the change with a Yes.
To export the narrated slides as a single video, click File, select Export, choose mp4 as your file format, give it a name and click Export.
PowerPoint is converting your presentation to a video at the bottom of your screen.
Once ready, find the video locally on your computer and upload it to Google Drive.
Then, enable sharing, copy the link and add it to Moodle.
That’s it!
More guidance is also available on TEL support. Go to https://telsupport.brookes.ac.uk and search for “PowerPoint”.