This article briefly explains what H5P is, providing links to existing resources offering a fuller explanation and examples of existing H5P content types. It then goes on to explain the two main methods for incorporating H5P content into a Moodle course.
What is H5P?
H5P, an abbreviation for ‘HTML5 Package’, allows you to create interactive content for inclusion in your Moodle course without the need for in-depth technical knowledge. H5P is free and provides a means to develop new and existing learning materials into fun and interactive experiences for your students. Visit the official H5P website for full details about H5P.
H5P Content Types
There are over 45 different H5P content types available to use; here are a just a few examples:
- Interactive video: Add interactivity to a video with explanations, extra images etc. You can also automatically pause the video at key points and request viewers answer multiple-choice questions before the video continues;
- Image hotspots: Upload an image and then add multiple hotspots to the image which, when clicked, can display explanations, other images, videos etc;
- Branching scenarios: Create self-paced learning activities where, presented with questions/dilemnas, the answers may navigate the viewer on a different path through the resource;
- Dialog cards: Define interactive “cards” where one side of the card prompts the user to think, the user clicks on the card to turn it over and check their answer;
- Accordion: Vertically stacks item lists that can be collapsed to save space.
For the full list of available content types, visit: Examples and Downloads | H5P
What is the Content Bank?
The Content Bank is one of the Moodle repositories that can be accessed via the file picker in Moodle. It is a separate space in Moodle accessed via the ‘More’ menu in contextual navigation where you can create, edit and store H5P content for use in Moodle courses.

Adding H5P to a Moodle course
There is a recommended workflow to adding H5P to a Moodle course; this has changed from how H5P was originally added to a course in that you initially define the H5P content itself, saving it in the Content Bank before then selecting it for use in Moodle.
Step 1: Define H5P content
- Go to your Moodle course. In the contextual navigation at the top of the screen select ‘More’ and then scroll down and click on Content bank (the second option).
- On the next screen, click on Add and then select the desired content type from the drop-down list.

- Give your activity a descriptive title.
- Once you’ve configured your content, click on Save to save it to the content bank.
Step 2: Decide how you want students to engage with the H5P content
Option 1: Add an H5P activity
You can add a direct link to your content from the course page by completing the following steps:
- On your course homepage, Turn editing on.
- Go to the section in your course where you wish your link to appear and click on + Add and activity or resource.
- Select the blue H5P icon (do not choose the black H5P icon labelled ‘Interactive Content’ – this option will eventually be retired):

- Give the activity a ‘Name’ – this is the link that the students will click on to engage with the H5P content. If you wish, enter a ‘Description’.
- For the ‘Package file’, click on the File icon:

- Click on Content bank and then click on the H5P content that you wish to use.
- On the next pop-up, leave the radio button with Link to the file selected, then click on Select this file.
- Finally click on Save and return to course.
Option 2: Embed H5P content in an existing Moodle activity
- On your course home page, Turn editing on.
- Locate the activity/resource within which you wish to embed your H5P content (in this example I am going to embed the content in an existing Moodle Page resource) and select Edit>Edit settings.
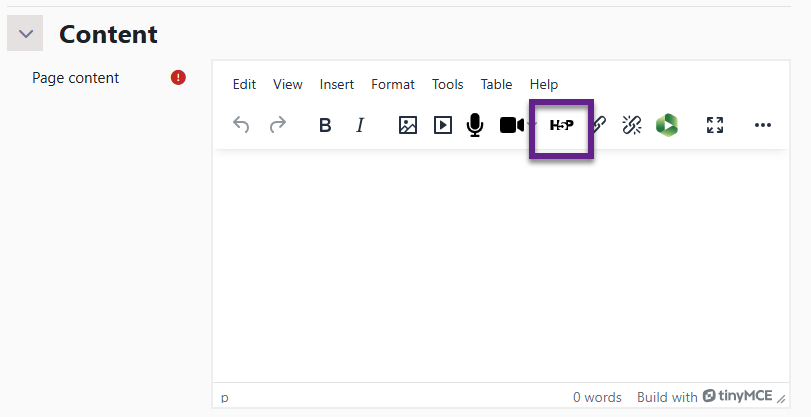
- Scroll down and postition your cursor to where you want to embed the content and, using the TinyMCE editor, first click on the down arrow icon in the top left of the content block to Show more buttons and then click on the H5P button.
- In the resulting pop-up, click on Browse repositories.

- Click on Content bank and then click on the H5P content that you wish to use.
- On the next pop-up, leave the radio button with Link to the file selected, then click on Select this file.
- Click on Insert H5P to confirm the embed.
- Click on Save and display to view the Page resource now with embedded H5P content.