Photogrammetry can be used to create 3D models of real-world objects, ranging in size from microscopic cells to mountains. All you need is a set of suitable images and some photogrammetry software.
Capturing the images
This is the most important part of the photogrammetry process.
Equipment
A phone, or digital camera will work, along with images taken down microscopes, screen captures etc.
Requirements
Images need to be in focus and without camera shake.
Images of items that are very shiny or transparent or of textureless objects require special treatment – see later for handling items like this. Your first attempt should not be of a shiny or transparent object if you can avoid it.
A large amount of overlap is required between each image. Don’t skimp on this.
Don’t chop of bits of the item in the images if you are photographing a single object. Get the whole object in frame.
Avoid hard shadows by keeping the lighting soft. Use a diffuser on lights if possible (e,g, place a tissue over each light source). If shooting outside, wait until a cloudy day if you can.
Image Capture Workflow
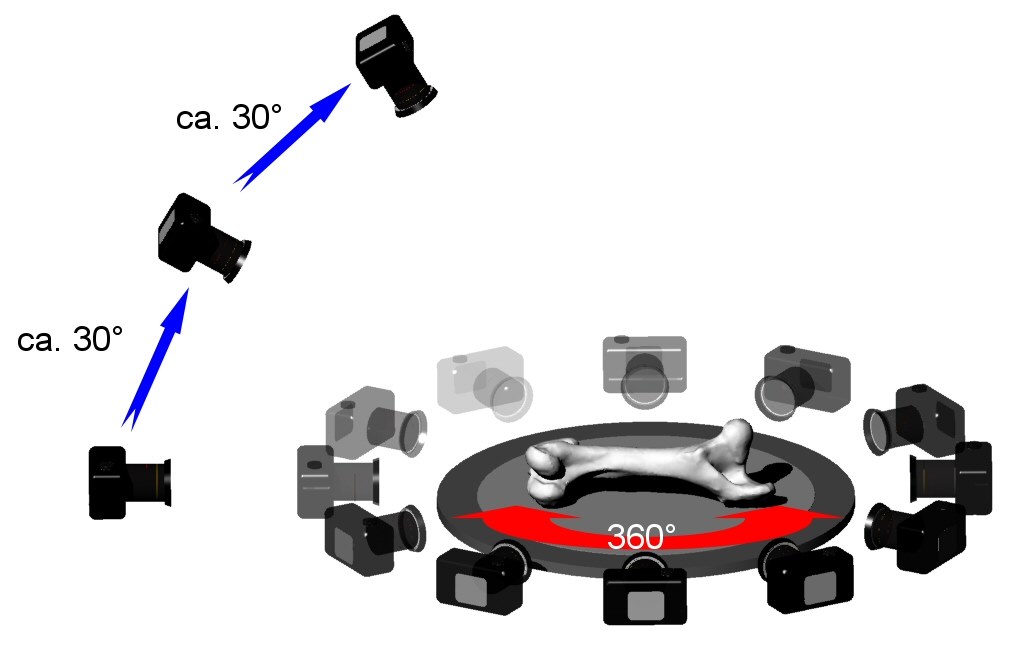
For a single object, the images are taken either by moving the camera around the item or by keeping the camera stationary and moving the object (usually on a turntable). For flat objects, like the walls of a room, the camera is moved parallel to the flat surface.
For an individual object (as opposed, say, the inside walls of a room) the idea is to take a series of images around the object at different angles and elevations. It’s best to follow the rule of one image per ten degrees around the item, giving a total of 36 images per circle around the object. The elevation is then changed (usually by around 30 degrees) and another rotation of 36 images captured. Three or four rotations should be enough. If the object is thin in one dimension, like a knife, say, the images near to the thin edge will need to be taken much closer together, say every 2 to 3 degrees rather than every ten and more that 36 images will be required per rotation.
If moving the camera, try and keep the objects in the background in the same position in all photos. The background can be used to help make the 3D model.
If using a turntable, make the background as plain as possible, and try to keep it out of focus if you can. Try making the background the same colour as the turntable. White or black paper is ideal for both turntable cover and background.
Using a turntable will allow you to capture the underside of an object – just flip the object on the turntable to a new orientation after each rotation and keep the camera stationary. Use at least four rotations.
Keep the lighting of the object as soft and shadow-free as you can. If shooting outdoors, wait for a cloudy day.
For flat surfaces, like walls, move the camera parallel to the surface of interest, ensuring lots of overlap between each image taken (at least 60%).

Shiny, Transparent or Textureless Objects
These objects will require treatment of the surface to render them suitable for the photogrammetric process. Covering the surface with paint, talcum powder or athlete’s foot spray are good options that can be washed off later. Stuck on coloured dots or random patterns of light from AV projectors are also good solutions.
Making the 3D model
A number of photogrammetry software packages are available that can convert image sets into 3D models. Free software includes Alicevision Meshroom, Colmap and Regard3D. Paid for software includes Agisoft Metashape (around £60 with the educational licence, £150 without) and 3D flow Zephyr (about £150). Both these offer free trials, so you can try before you by. The paid for software is much more consistent at producing good models when compared to the free options. There are also some cloud-based processing options like AutoDesk (free for education users) or Reality Capture.
Sometimes it may be necessary to remove the background form each photo in the image set, leaving just the object on each frame. The paid for software will have a masking tool to speed up this process. The alternative is to remove the background using a tool like Photoshop, Affinity Photo or Gimp.
Some software packages require specific hardware in the PC in order to work. These usually require a graphics card made with an Nvidia processor to be installed. If you have no idea if your computer has a graphics card, assume that it doesn’t. The software that requires an Nvidia card to work includes Alicevision Meshroom (the best free software). You may need to run one of the cloud-based services (Reality Capture or AutoDesk Recap) or use 3DFlow Zephyr or Regard3D if you do not have Nvidia graphics.